

How To Lcok Certain Parts Of Square Register
How to install and prepare the Nest × Yale Lock
The Google Nest × Yale Lock can be installed on virtually standard doors. However, your door needs to meet sure size requirements.
After you've removed your current lock and installed the Nest × Yale Lock, you must test and calibrate information technology. So, connect it to the Nest app and then you can control it with your phone.
During installation, the Nest × Yale lock requires precise alignment to connect the parts to your door and each other. The steps are relatively straightforward, only you must pay attention to the details.
If you want an overview of steps, y'all tin can watch our video on how to install and set up the Nest × Yale Lock.
Of import things to know before y'all start
-
Bank check that your door meets the following requirements (well-nigh standard doors will). Y'all can use the template included in the installation manual or a measuring tape.
-
Your door's thickness is whatsoever of the following:
- ane ⅜ inches
- 1 ¾ inches
- 2 to ii ¼ inches
-
-
The lock hole center is either 2 ⅜ or two ¾ inches from the border of the door.
Note: If your door's lock holes are out of these specs you can either re-drill the holes after you've removed your electric current lock. Don't want to install it yourself? Contact our installation partner, OnTech, to help you check your system'due south compatibility, install, and set up your Nest products.
- Go on your quondam lock handy, only in example. The Nest × Yale Lock works with near standard doors. However, if there's an upshot, you can reinstall your quondam lock and get installation assistance. To get a professional to aid install and prepare upward your Nest products, contact our installation partner, OnTech.
- Do not install the batteries before you are told to by the installation instructions. If you lot do, the lock may non calibrate itself correctly and have problems locking.
- Install the Nest × Yale strike plate that comes with your lock. If y'all don't, your lock may jam. While your current strike plate may look the aforementioned, the Yale plate is engineered to precisely fit your new lock.
- Shut the door during the lock exam as instructed. If you don't, your lock may calibrate itself to your door and jam. Don't worry about getting locked out during the test. If your lock does not successfully calibrate, it should automatically unlock.
What yous need to become started
Everything you demand to go started to install the lock is in the box. Check that y'all have all the parts:
- Nest × Yale Lock
- Mounting screws
- four AA batteries
- Installation fundamental
- Installation manual
- Nest Connect (Bundles only)

Your lock'southward installation manual also comes with a template for measuring your door. You can as well use your own measuring tape.

Yous'll also need some additional tools:
-
Phillips screwdriver or a power drill with Phillips bit
To connect your lock to the Nest app and the internet, yous need:
- A compatible phone or tablet (check the requirements here)
- Your Wi-Fi network password
1. Install Nest 10 Yale Lock
1. Remove your quondam lock
Remove the electric current lock and strike plate if you lot have one already installed on the door. You may need a different screwdriver or wrench to fit your lock's hardware.
Re-drill the lock holes if needed.
If your lock hole'southward center isn't either 2 ⅜ or 2 ¾ inches from the edge of the door, you'll demand to re-drill them in the right identify.
Use a 2 ⅜ inch spade drill fleck and the template from the installation transmission to reposition the holes. You may also need a chisel to reposition the cutout for the latch plate.
Don't desire to install it yourself? Contact our installation partner, OnTech, to assistance you bank check your organization'south compatibility, install, and ready your Nest products.
Keep your old lock handy.
The Nest × Yale lock works with most standard doors. However, if in that location'southward an issue, you lot can merely reinstall your old lock and get installation aid. To get a professional to help install and gear up your Nest products, contact our installation partner, OnTech.
ii. Install the deadbolt
-
Before you put the deadbolt in your door, conform its length to fit your door and brand sure the deadbolt is retracted.
-
Printing fit the deadbolt into the door as shown. Then, use ii of the included screws to secure it.
Important: If you're using a drill, utilize a depression torque setting to avert stripping the spiral threads.
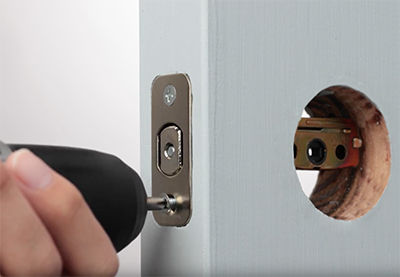
iii. Install the strike plate

Important: You must install the new strike plate included with your lock, even if it looks the same as your current ane. If you do not, your lock may jam.
Remove your current strike plate and install the included strike plate in your door frame.
Make sure the hole in the plate lines up with the lock's deadbolt before you install it. If non, arrange the cutout for the plate with a chisel.
Note: You lot can use either the short screws for easier installation with a screwdriver, or the long screws for actress security.
4. Install the keypad on the outside of the door

Of import: Double bank check that the deadbolt is fully retracted and that the latch hole is horizontal before you continue.
-
Run the cablevision through the lock hole.
-
Printing to fit the keypad into the hole. It should concord itself in place.
5. Install the mounting plate
-
Pull the mounting plate off the back of the lock.

-
Insert the included central into the hole at the top of the lock and printing down. Pull the battery cover directly off.
Tip: You tin use a thumbtack instead of the key.
-
Run the lock'south cable through the hole in the mounting plate and printing the mounting plate pins through the holes in the deadbolt.
-
Use the bolts that are the right length for your door to secure the mounting plate.
-
Before you fully tighten them, make sure the keypad and plate are square to the door. Y'all can use a bubble level if needed.
6. Install the lock
-
Plug the cablevision to the connector on the lock. It can only be plugged in one way. Await for a pocket-size tab to marshal it correctly. So, route the cable behind the cablevision hooks to agree information technology in place.

Important: Make sure the lock'southward thumb turn is pointed vertically and the deadbolt is fully retracted before you attach the lock to the plate.
-
Guide the spindle through the hole and claw the lock onto the bottom of the mounting plate. Printing the lock firmly onto the plate. It should snap into place.

-
Use the 2 small black bolts to spiral your lock into the mounting plate. You lot tin find the holes for the bolts in the battery compartment of your lock.
2. Test and set up upwardly your lock
1. Test your lock
Test that your lock works with the door both open up and airtight.

-
With the door open:
- Plow the thumb turn and make sure the deadbolt fully extends.
- Plow the thumb plough so the deadbolt is retracted.
-
With the door closed:
-
Plough the thumb turn to lock the door.
If y'all feel resistance, or the deadbolt doesn't extend fully, remove the lock and re-cheque the deadbolt and lock installation.
2. Install the batteries
-
Close the door before you install the batteries.
Important: Keep the door unlocked while you install the batteries. If the door is locked, your lock might not test and calibrate itself to your door properly.
-
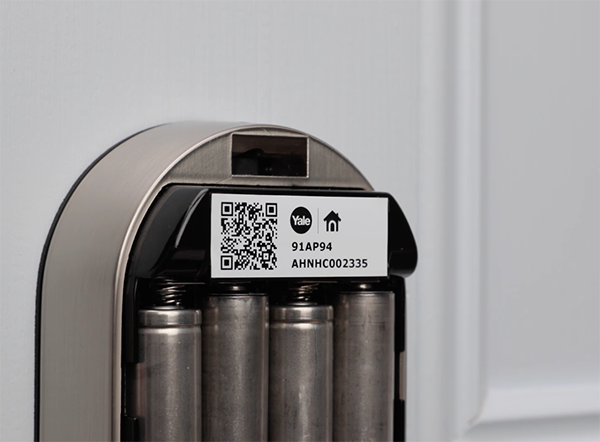
Insert the included AA batteries into the battery compartment. The lock should turn on and play the Nest greeting.
-
Don't put on the battery cover yet. The Nest app requires you lot to browse the code in the battery compartment when you connect.
Note: If your lock does not successfully calibrate, reset it to defaults, and follow the steps to continue setup.
three. Create a main passcode
-
To wake your lock, touch your palm to the keypad or press the Yale logo.
-
The lock should tell you lot how to create a temporary passcode for your lock before you connect information technology to the Nest app.
Note: Once yous've connected your lock to the Nest app, yous'll create a new passcode for your lock. Afterwards that, you won't need this temporary master passcode anymore.
iv. Calibrate the deadbolt/lock
The lock should ask you to close the door and so it can calibrate itself. If the lock detects an issue (such as a jam), it should automatically unlock.
iii. Connect your lock to the Nest app
1. Sign into your account
If you're new to Nest, become to the Apple App Shop or Google Play to download the Nest app and create an account.
If you already ain a Nest product, sign into your account on the app, if you aren't already.
Note: If you lot have more one home in your business relationship, brand sure that you first select the Nest dwelling where you want to install your camera. Tap the Bill of fare in the top left of the home screen to change homes.
2. Have Nest Connect, Nest Guard, or Nest Hub Max already fix
Your Nest × Yale Lock uses a Nest Connect, Nest Baby-sit, or Nest Hub Max to get internet connection. Information technology doesn't connect directly to Wi-Fi.
You must have one of these devices already continued to the Nest app to add the Nest × Yale lock. If you lot don't, use the Nest app to prepare either of them upwards.
In one case the Connect, or Guard, or Nest Hub Max is ready up, you can proceed to set up your lock.
3. Browse QR lawmaking
To begin, open the Nest app tap Settings
select Add product.
-
The app should ask you to browse the QR lawmaking on your product so it knows what device you want to install. The Nest × Yale Lock code is in the battery compartment.
-
Start with your phone most a human foot away and slowly movement it closer to the code. It doesn't need to fill the box in the app to scan.
Tip: Equally you lot browse the lawmaking, make certain yous have good lighting and that there's no shadow covering the lawmaking.
-
If you notwithstanding can't scan the code, tap Continue Without Scanning and type in the numbers at the elevation of the QR lawmaking.
-
Once the app knows what device you lot're trying to install, information technology should guide yous through all the steps.
4. Connect your lock to the app
-
Tell the app where your lock is installed. The app volition use this location when it sends you notifications, so pick 1 that makes sense.
-
The app should start to look for another Nest product that your lock can connect to (either a Baby-sit, Connect, or Nest Hub Max).
-
When it's establish ane, press and concord the white button above your lock's thumb plow to connect them.
Troubleshooting tip: If your lock can't connect, move your Baby-sit, Connect, or Hub Max closer to your lock. Even a few inches or a couple of feet can make a departure.
5. Create Nest passcodes
Create a Nest passcode with the app. This passcode will supervene upon the master passcode yous created on the lock.
The app should inquire if you lot want to create passcodes for other people who share access to your Nest home. You can also invite new people to share admission, and you can prepare a schedule that limits when a person tin can enter your domicile.
Now that your lock is installed and set upward, you can get started using your Nest × Yale Lock.
Was this helpful?
How can we improve it?

How To Lcok Certain Parts Of Square Register,
Source: https://support.google.com/googlenest/answer/9210317?hl=en
Posted by: cephaswhersely1982.blogspot.com
0 Response to "How To Lcok Certain Parts Of Square Register"
Post a Comment